SerialLab++, or Multiple-Value Mayhem with StudioStat
The Serial Lab will go down in SVA IxD Physical Computing history as the easiest/shortest lab ever! Because I worked on it with Chris who has so done a great job of documenting it, there is no need to rehash how it went here. Instead, I’ll tell you all about the exciting fantastic adventures of our midterm project, Studio Stat, which involved the use of serial communication to manifest button-press activity on an on-screen display.
Prior to actually doing the lab, I was working on our midterm project with Team Harpy (comprised of Catherine, Chris, and me). For the project, we needed to visualize button-presses and a linear potentiometer’s input on a computer screen via Processing.
Here is a peek at what our final on-screen visualization looks like:

Here is a video of the visualization in action:
StudioStat in action from Tina Ye on Vimeo.
And here is how we set that all up…
On the Arduino/wiring end of things, we have the following circuit:
[insert circuit diagram]
Processing and Arduino basically communicate using the serial port (which is a common language shared by devices). To get Processing to generate a pretty visualization, all you need to do is to get Arduino to write some values to the serial port, then Processing to parse those incoming values.
This project differed from the lab in that that the lab only accounted for a single input, whereas our project needed to feed in 5 different inputs simultaneously. But the underlying principles were the same; i just it took a while to figure out how to build the multiple-value output in Arduino and then parse it correctly in Processing. Below I’ll try to explain how I did it.
The code that we loaded into the Arduino is as follows:
Click to view. (Unfortunately Tumblr is being evil and not formatting large chunks of code correctly when I paste.)
For serial communication, the important part of the Arduino code is this part:
Serial.print(serialVal);
Serial.print(",");
Serial.print(state1);
Serial.print(",");
Serial.print(state2);
Serial.print(",");
 Serial.print(state3);
Serial.print(",");
Serial.print(state4);
Serial.print("n");
This is a lot more lines of code than the serial lab because, as mentioned above, I am attempting to send the values from multiple inputs instead of one. In StudioStat, we have the potentiometer and four buttons, rather than just the one twisty potentiometer in the lab.
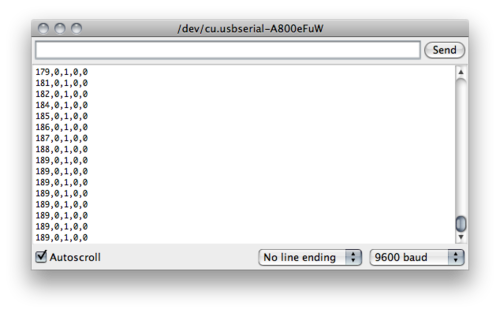
In addition to sending these input values, I also had to send delimiters. These are divider characters that you know aren’t going to be part of the values, so you can use them to demarcate where one value ends and another begins. Commas, line breaks, pipes etc. are commonly used. Since my values are all numerical, I can safely use commas. So for here, each value gets a comma in between, and “bundle” of values (comprised of 1 potentiometer reading and 4 button state readings) gets a linebreak (“n”) between it. All this does is generate a serial output that looks something like this:
Then on the Processing side of things, we have this code (click to download).
The first important bit is this:
String inString = myPort.readStringUntil('n');
… which reads a single line of input from the serial monitor at a time. I used readStringUntil() instead of simply read() because read just reads nonstop, whereas readStringUntil lets you specify a certain character to, well, read until. Here I specified the linebreak character as the delimiter to stop reading at, and that allows me to grab one row of values from the serial port at a time.
The next important bit of code is this:
 inString = inString.trim();
  println(inString);
  String[] inputs = inString.split(",");
  moodVal = Integer.parseInt(inputs[0]);
  // != thingy is secret shortcut to converts int to boolean
  button1 = (Integer.parseInt(inputs[1]) != 0);
  button2 = (Integer.parseInt(inputs[2]) != 0);
  button3 = (Integer.parseInt(inputs[3]) != 0);
  button4 = (Integer.parseInt(inputs[4]) != 0);
… which parses that single line of input by splitting it up and storing it into variables. Note that here it’s important to be careful of variable typing. I had declared the variables for button1-4 as booleans earlier, so they need to be converted to booleans before getting stored into those variables. I used a simple little shortcut that converts ASCII 0’s and 1’s into boolean values: you just set that value as !=0 and voila! It magically turns into a boolean. (Hopefully that makes sense…)
Anyway, after Processing splits up the single line of input and packages them separately into nice little named variables, it can do whatever with them, such as generate a little circle that appears to slide up or down, or make words highlight/unhighlight.
And that’s how I managed to get some multiple-value fanciness out of serial communication. It seems to me that theoretically, using commas to separate values, you can feed as many values as you want at a time into Processing, not just 5. (Check on this.) You might need a longer delay time though if you really got a lot of values. (Rob, does that make any sense at all?)
Armed with this, now the Processing mayhem can really begin!
*****
EDIT: I wrote this entry before we learned about byte packets, and now I know there is a another (probably more reliable) way to send multiple values through the serial port. But at the time, this was still pretty exciting for us. I guess in programming, there’s always more than one way to do what you want!